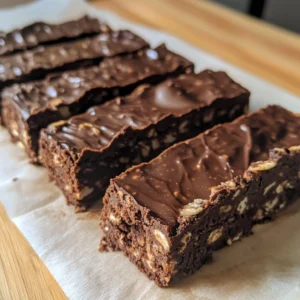
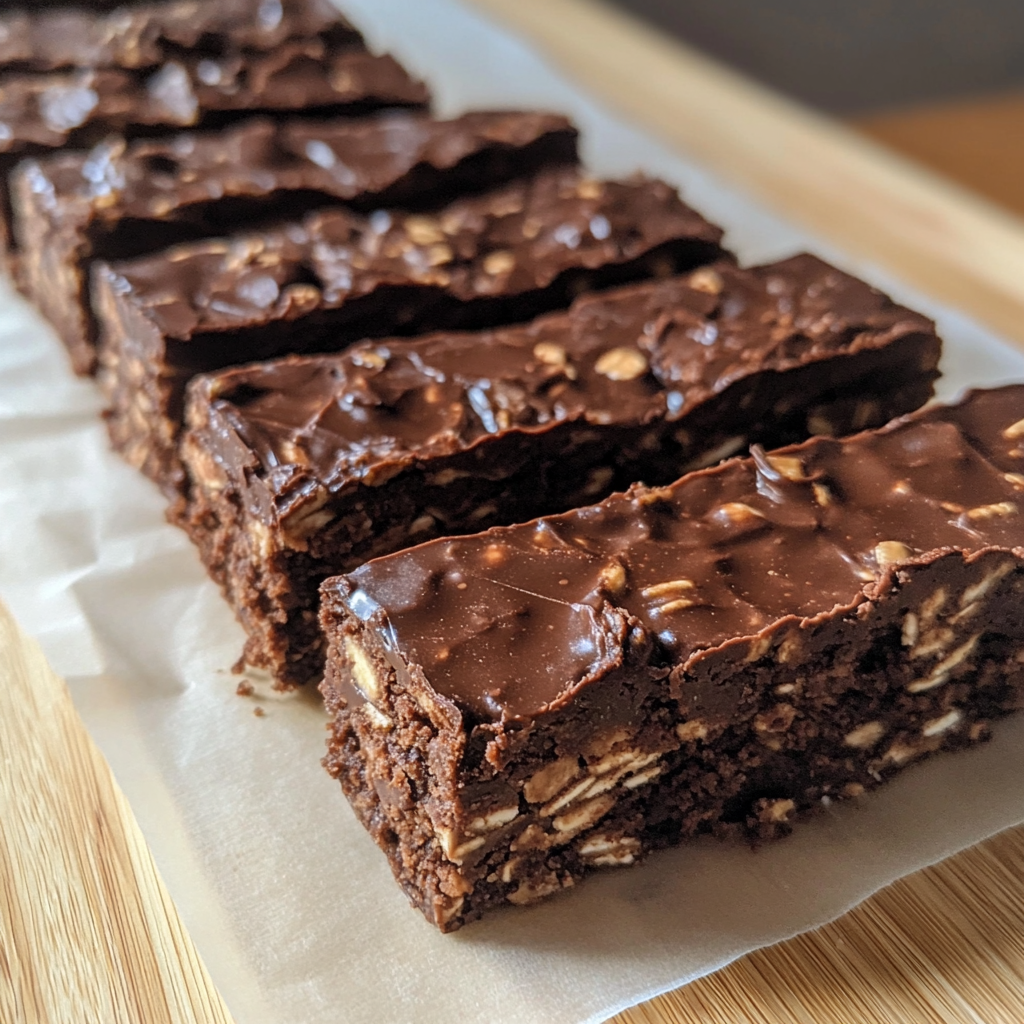
If you’re craving a treat that’s both indulgent and nutritious, these Thick Dark Chocolate Greek Yogurt Brownie Granola Bars are the perfect choice. Combining the rich flavors of dark chocolate with the wholesome goodness of Greek yogurt and granola, these bars are a delightful way to satisfy your sweet tooth without the guilt. Whether you’re looking for a quick snack, a post-workout treat, or a dessert that won’t derail your healthy eating, these granola bars are sure to hit the spot.
Why You’ll Love This Recipe
These granola bars are incredibly versatile and can be enjoyed in so many ways. Whether you’re looking for a quick breakfast, a post-workout snack, or just a little something sweet to satisfy your cravings, these granola bars are sure to hit the spot.
✅ Perfect for Any Occasion
These granola bars are incredibly versatile and can be enjoyed in so many ways. Whether you’re looking for a quick breakfast, a post-workout snack, or just a little something sweet to satisfy your cravings, these granola bars are sure to hit the spot.
✅ Packed with Nutrients
Each ingredient in these granola bars brings something special to the table. From the protein-packed Greek yogurt to the antioxidant-rich dark chocolate, these granola bars are loaded with wholesome ingredients that you can feel good about eating.
✅ Easy to Customize
One of the best things about this recipe is how customizable it is. You can easily swap out ingredients to suit your tastes or dietary needs. Whether you’re a fan of almond butter or prefer a different sweetener, these granola bars can be tailored to your liking.
🛒 Ingredients Needed
To make this recipe, you’ll only need a few simple ingredients, most of which are pantry or fridge staples.
Main Ingredients
- 1/2 cup Greek yogurt: Adds a tangy flavor and a creamy texture, high in protein.
- 1/3 cup honey or maple syrup: Adds just the right amount of sweetness.
- 1/4 cup cocoa powder: Adds a rich, chocolatey flavor and is packed with antioxidants.
- 1/2 cup dark chocolate chips (melted): Adds little bursts of chocolate goodness.
- 1 1/2 cups granola: Provides a chewy texture and a good source of fiber.
- 1/2 cup oat flour: Provides a chewy texture and a good source of fiber.
- 1 teaspoon vanilla extract: Adds a warm, aromatic flavor.
- Pinch of salt: Enhances all the flavors and brings everything together.
👩🍳 How to Make It
Step 1: Mix the Wet Ingredients
In a large bowl, combine the Greek yogurt, honey (or maple syrup), cocoa powder, melted dark chocolate, vanilla extract, and a pinch of salt. Mix everything together until it’s creamy and well combined. I like to use a wooden spoon for this step – it just feels more rustic and hands-on. Mixing the wet ingredients first ensures that they are well incorporated and creates a smooth, creamy base for the granola bars.
Step 2: Add the Dry Ingredients
Stir in the granola and oat flour. Mix until everything is evenly distributed. The mixture should be thick and sticky. Adding the dry ingredients gradually helps to prevent lumps and ensures a smooth, even mixture.
Step 3: Press the Mixture
Press the mixture firmly into a parchment-lined 8×8-inch pan. Pressing the mixture firmly ensures that the granola bars hold together well and have a consistent texture.
Step 4: Bake or Refrigerate
Pop the pan into the preheated oven and bake at 350°F (175°C) for 20–24 minutes, or until the granola bars are firm. Alternatively, you can refrigerate the mixture until firm if you prefer a no-bake option. Baking or refrigerating the granola bars ensures that they’re cooked through but still moist and tender.
Step 5: Cool and Slice
Let the granola bars cool completely in the pan before lifting them out using the parchment paper. Slice them into your desired size and enjoy! Cooling the granola bars before slicing allows the flavors to meld together and creates a more cohesive, delicious final product.
💡 Expert Tips & Storage
Tips for Success
-
Use Ripe Bananas: If you’re adding bananas to the recipe, make sure they’re ripe. Ripe bananas are sweeter and easier to mash, which adds natural sweetness to the granola bars.
-
Customize Your Nut Butter: If you’re not a fan of peanut butter, you can use almond butter, cashew butter, or even sunflower seed butter for a nut-free option. Experimenting with different nut butters can add a unique flavor and texture to the granola bars.
-
Add Protein Powder: For an extra protein boost, you can add a scoop of your favorite protein powder to the mixture. Just be sure to adjust the liquid ingredients accordingly to maintain the right consistency.
Storage Tips
-
Storage: Keep the granola bars in an airtight container at room temperature for up to a week. They’ll stay fresh and firm, ready to grab and go whenever you need a quick snack. Storing the granola bars in an airtight container helps to preserve their freshness and flavor.
-
Freezing: If you want to make a big batch and save some for later, you can freeze the granola bars for up to three months. Just wrap them individually in plastic wrap or parchment paper and store them in a freezer-safe bag or container. When you’re ready to enjoy one, simply thaw it at room temperature for a few minutes. Freezing the granola bars is a great way to have a nutritious, delicious snack on hand whenever you need it.
-
Avoiding Dryness: To prevent the granola bars from drying out, make sure they’re stored in an airtight container. If they do start to dry out a bit, you can refresh them by microwaving them for a few seconds or letting them sit at room temperature for a little while. Keeping the granola bars moist and fresh ensures that they’re always ready to enjoy.
❓ FAQs
Can I make these granola bars gluten-free?
Absolutely! Just make sure to use certified gluten-free oat flour and granola to ensure there’s no cross-contamination. Using gluten-free ingredients ensures that these granola bars are safe and delicious for those with gluten sensitivities or allergies.
Can I substitute the peanut butter with another nut butter?
Yes, you can use any nut or seed butter you prefer. Almond butter, cashew butter, and sunflower seed butter all work well. Experimenting with different nut butters can add a unique flavor and texture to the granola bars.
How long do these granola bars last at room temperature?
They’ll stay fresh at room temperature for up to a week if stored in an airtight container. Storing the granola bars in an airtight container helps to preserve their freshness and flavor.
Can I add protein powder to these granola bars?
Yes, you can add a scoop of protein powder for an extra protein boost. Just be sure to adjust the liquid ingredients accordingly to maintain the right consistency. Adding protein powder can make these granola bars an even more powerful post-workout snack or a great way to start your day.
Can I use quick oats instead of oat flour?
You can make your own oat flour by blending quick oats in a food processor until they reach a fine, flour-like consistency. Just be aware that the texture might be slightly different. Using quick oats can add a hearty, wholesome flavor to the granola bars and make them even more delicious.
Can I use regular chocolate chips instead of dark chocolate chips?
Yes, you can use regular chocolate chips or even chunks of milk chocolate. The dark chocolate chips just add a richer, more intense chocolate flavor. Using different types of chocolate can add a new level of richness and flavor to the granola bars.
🍪 More Recipes You’ll Love
- Healthy Peanut Butter Greek Yogurt Chocolate Chip Breakfast Bread
- Thick & Gooey Peanut Butter Greek Yogurt Chocolate Banana Bread Bars
- Healthy No-Bake Chocolate Peanut Butter Banana Crunch Bars
💭 Final Thoughts
I hope you enjoy making and eating these Thick Dark Chocolate Greek Yogurt Brownie Granola Bars as much as I do. They might not look fancy, but trust me—one bite and you’ll wonder how you ever snacked without them. Plus, they’re loaded with wholesome ingredients that you can feel good about eating.
So, the next time you’re craving something sweet but want to stay on track with your health goals, give these granola bars a try. I promise you won’t be disappointed. And if you do make them, I’d love to hear how they turned out! Share your thoughts and any creative twists you added in the comments below. Happy baking!