Introduction
My mornings used to be a chaotic rush, grabbing whatever I could find for a quick energy boost. But I always craved something more substantial, something that felt like a treat but fueled me properly. That’s when the idea for these bars struck me – the comforting flavors of peanut butter and chocolate, the satisfying chew of oats, all transformed into a convenient, no-bake bar. It was like taking my favorite overnight oats and turning them into a decadent fudge! Honestly, I wasn’t sure if it would work, but that first chilled bite? Pure bliss. What makes these bars the perfect healthy indulgence? Let’s find out…
Why You’ll Love This Recipe
Ready in minutes – no baking required for this delightful treat! Combines the classic and irresistible flavors of peanut butter and chocolate. Packed with wholesome ingredients like oats and natural sweeteners. Perfect for a quick breakfast, satisfying snack, or healthier dessert. Naturally gluten-free (if you use certified gluten-free oats!). Easy to customize with your favorite additions.
Ingredients Needed
- ½ cup natural peanut butter (creamy or crunchy)
- ¼ cup honey or maple syrup
- 1 teaspoon vanilla extract
- 1 cup rolled oats (old-fashioned, not instant)
- ¼ cup unsweetened cocoa powder
- ¼ cup dark chocolate chips
- Pinch of sea salt
Ingredient Notes
For the peanut butter, natural is key – just peanuts and maybe a little salt. Creamy gives a smoother bar, while crunchy adds texture. Honey or maple syrup both work beautifully as natural sweeteners; adjust to your preference. Old-fashioned rolled oats provide the best chewy texture; avoid instant oats. Unsweetened cocoa powder gives that rich chocolate flavor without added sugar. Dark chocolate chips add little bursts of decadence – the darker, the better in my opinion! A tiny pinch of sea salt enhances all the flavors.
How to Make It
Step 1: Creamy Dream Base
In a medium mixing bowl, combine the ½ cup of natural peanut butter, ¼ cup of honey or maple syrup, and 1 teaspoon of vanilla extract. Add the ¼ cup of unsweetened cocoa powder and a tiny pinch of sea salt. Now, get ready to stir! Mix everything together thoroughly until you have a smooth and creamy base. It might take a minute or two for the cocoa powder to fully incorporate, but keep at it – you want a rich, chocolatey peanut butter mixture.
Step 2: Oat-So-Good Addition
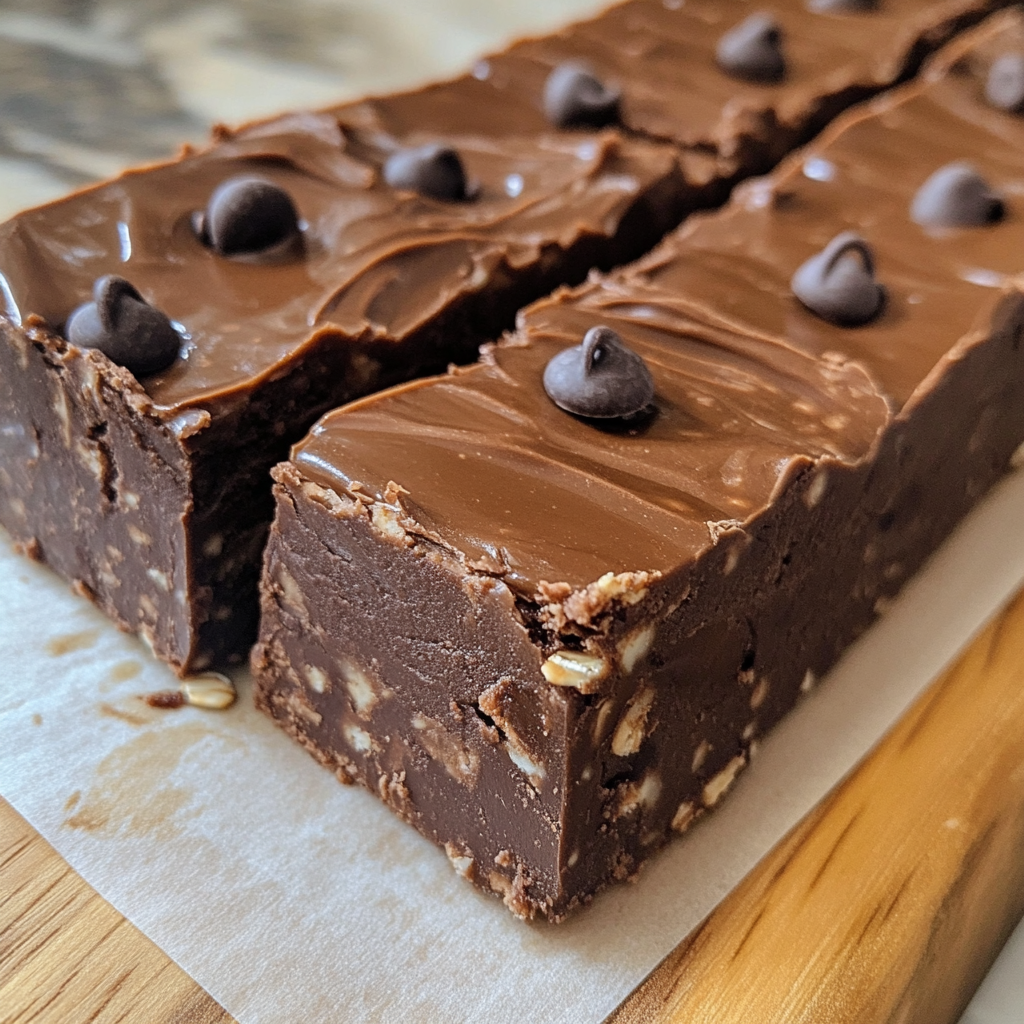
Now, pour the 1 cup of rolled oats and the ¼ cup of dark chocolate chips into your creamy peanut butter mixture. Using a sturdy spatula or a wooden spoon, gently but thoroughly fold everything together. You want to make sure that all the oats and chocolate chips are evenly coated with the peanut butter and chocolate base. Don’t overmix, but ensure every oat flake gets a little bit of that delicious coating.
Step 3: Press and Prepare
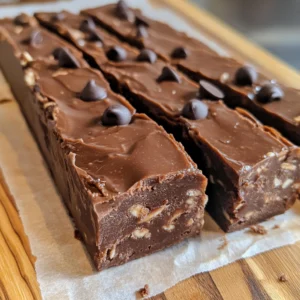
Line an 8×8 inch baking pan with parchment paper, leaving a little overhang on the sides. This will act as handles later, making it super easy to lift the bars out. Transfer the oat and peanut butter mixture into the lined pan. Using the back of a spoon or your fingers (slightly dampened to prevent sticking), press the mixture firmly and evenly into the pan, making sure to get into all the corners.
Step 4: Chill for Perfection
Once the mixture is evenly pressed into the pan, cover it tightly with plastic wrap or a reusable lid. Now comes the hardest part – patience! Refrigerate the pan overnight, or for at least 4-6 hours, to allow the bars to firm up completely. This chilling time is crucial for the oats to absorb the moisture and for the bars to set into a sliceable consistency. Trust me, the wait is worth it for those perfect, fudgy bars!
Nutritional Information
- Calories: 200-250 per bar (estimated)
- Protein: 8-10g
- Fat: 12-15g
- Carbs: 20-25g
- Sugar: 8-10g (mostly from natural sources)
Key Ingredients Breakdown + Health Benefits
Natural Peanut Butter – You know, I used to think all peanut butter was created equal. Then I started paying attention to the labels – the natural stuff, with just peanuts and maybe a little salt, is a game-changer! It’s packed with heart-healthy monounsaturated fats and provides a good source of plant-based protein, which helps keep you feeling full and satisfied. Plus, it adds that classic nutty flavor we all love.
Honey or Maple Syrup – Ditching refined sugar was one of the best changes I made in my kitchen. Honey and maple syrup are natural sweeteners that not only add delicious sweetness but also contain antioxidants and trace minerals. Honey has a lovely floral note, while maple syrup offers a rich, caramel-like flavor. It’s a win-win!
Vanilla Extract – This little ingredient might seem insignificant, but it really enhances the overall flavor profile of these bars, adding a touch of warmth and complexity. I always opt for pure vanilla extract – the difference in taste is definitely noticeable. It just rounds everything out beautifully.
Rolled Oats – My relationship with oats has evolved over the years. From mushy childhood breakfasts to these incredible no-bake bars, they’re a nutritional powerhouse! Packed with fiber, which is fantastic for digestion and helps regulate blood sugar levels. They also provide sustained energy, making these bars a great way to start your day or fuel an afternoon workout.
Unsweetened Cocoa Powder – Who says chocolate can’t be healthy-ish? Unsweetened cocoa powder is rich in flavonoids, powerful antioxidants that have been linked to various health benefits, including improved heart health. Plus, it delivers that intense chocolate flavor we crave without any added sugar. It’s a guilt-free way to satisfy that chocolate craving.
Dark Chocolate Chips – A little bit of dark chocolate goes a long way! Opting for dark chocolate chips (at least 70% cacao) means you’re getting a dose of those beneficial flavonoids along with that rich, slightly bitter chocolate taste that complements the peanut butter perfectly. It adds little bursts of decadence and makes these bars feel like a real treat.
Why This Recipe Works
The magic of these no-bake bars lies in the simple science of binding and chilling. The creamy peanut butter, combined with the sticky sweetness of honey or maple syrup, acts as the perfect glue to hold the rolled oats and chocolate chips together. The cocoa powder dissolves into this sticky base, infusing every bite with a rich chocolate flavor.
The overnight refrigeration process is crucial. It allows the oats to absorb some of the moisture from the peanut butter and honey, softening them just enough to create a chewy, almost
fudgy texture. The dark chocolate chips remain mostly intact, providing little pockets of intense chocolate flavor throughout the bar. The pinch of salt might seem small, but it plays a vital role in enhancing all the sweet and nutty flavors, creating a well-balanced and incredibly satisfying treat. It’s a testament to how simple ingredients, when combined correctly and given a little time to meld, can create something truly delicious and wholesome.
Is This Recipe Right for You?
If you’re looking for a quick, easy, and healthy snack or breakfast option that doesn’t require any baking, then these peanut butter chocolate overnight oat fudge bars are definitely for you! They’re perfect for busy mornings, satisfying afternoon cravings, or even a healthier dessert alternative. Plus, they’re a hit with both kids and adults, making them a great family-friendly treat.
Who Should Avoid It?
The most obvious concern here is peanut allergies. If you have a peanut allergy, you should absolutely avoid this recipe. For those following a strict gluten-free diet, ensure you use certified gluten-free rolled oats. While naturally dairy-free, always check the ingredients of your chocolate chips.
Customization Ideas
- Nut Butter Swap: Experiment with almond butter, cashew butter, or sunflower seed butter for a different nutty flavor profile.
- Seed Power: Add a tablespoon or two of chia seeds, flax seeds, or hemp seeds for an extra boost of nutrition and a slightly different texture.
- Fruity Fun: Stir in some dried cranberries, chopped dates, or raisins for a chewy and fruity twist.
- Protein Boost: Mix in a scoop of your favorite protein powder (chocolate or vanilla would work well) for an extra protein punch. You might need to add a touch more liquid if the mixture becomes too dry.
- Spice it Up: Add a pinch of cinnamon or a dash of espresso powder to the peanut butter mixture for added warmth or a mocha flavor.
Kitchen Tools You’ll Need
You really don’t need much for this straightforward recipe! A medium-sized mixing bowl is essential for combining all the ingredients. You’ll also need a sturdy spatula or wooden spoon for mixing. For pressing the mixture, an 8×8 inch baking pan is required, and lining it with parchment paper will make removing the bars a breeze. Finally, measuring cups and spoons to ensure you have the right proportions.
Pro Tips & Common Mistakes
One of the most common mistakes people make with no-bake bars is not pressing the mixture firmly enough into the pan. You really need to compact it well to ensure the bars hold together when you slice them. I learned this the hard way when my first batch crumbled into more of a granola situation than neat bars!
Another tip is to use the right kind of oats. Instant oats will become too mushy and won’t provide that satisfying chewiness that rolled oats offer. Stick with the old-fashioned rolled oats for the best texture.
When mixing the peanut butter and cocoa powder, make sure you get everything fully incorporated. You don’t want any streaks of dry cocoa powder in your bars. It might take a little extra stirring, but it’s worth it for that uniform chocolatey flavor.
Finally, resist the urge to cut the bars before they’ve had ample time to chill in the refrigerator. Overnight is truly best, as it allows the oats to fully absorb the moisture and the bars to firm up properly. Trying to slice them too early will likely result in a sticky, messy situation. Trust me, patience is key with this recipe! I once tried to rush it after only a couple of hours, and let’s just say the results were less than elegant.
Serving Suggestions
These peanut butter chocolate overnight oat fudge bars are perfect enjoyed straight from the refrigerator for a quick breakfast on the go, a satisfying midday snack, or even a healthier dessert option.
They pair wonderfully with a glass of cold milk, a dollop of Greek yogurt, or a side of fresh fruit for a more complete meal or snack. If you’re feeling a little extra indulgent, you could even drizzle a bit of extra melted peanut butter or a sprinkle of flaky sea salt on top just before serving.
Reader Success Stories
“These bars have become my new go-to breakfast! They’re so easy to make the night before, and they keep me full and energized all morning. The peanut butter and chocolate flavor is just irresistible!” – Jessica M.
“I love having these on hand for a quick and healthy snack at work. They satisfy my sweet tooth without all the guilt, and the oats keep me feeling satisfied until my next meal. Plus, everyone who’s tried them has asked for the recipe!” – Michael R.
“As a busy mom, I’m always looking for easy and nutritious snacks for my kids. These bars are a huge hit! They think they’re getting a special treat, but I love knowing they’re getting the goodness of oats and peanut butter. Definitely a winner in our house!” – Sarah L.
Storing & Freezing Guide
These no-bake bars will keep well in an airtight container in the refrigerator for up to one week. For longer storage, they freeze beautifully for up to 2-3 months. To freeze, simply wrap the entire pan tightly in plastic wrap and then in a layer of aluminum foil, or cut the bars into individual portions and wrap each one separately before placing them in a freezer-safe bag or container.
To thaw, simply transfer the bars from the freezer to the refrigerator for a few hours or overnight. You can also enjoy them slightly frozen for a firmer, more fudge-like texture.
FAQs
Q: Can I use quick oats instead of rolled oats? A: While you can, the texture will be quite different. Quick oats tend to become softer and more mushy, resulting in a less chewy bar. Rolled oats provide the best texture for these bars.
Q: My mixture seems too dry. What should I do? A: Different brands of peanut butter can vary in consistency. If your mixture seems too dry, try adding an extra tablespoon of honey or maple syrup, or even a teaspoon of milk (dairy or non-dairy) to help bind everything together.
Q: Can I make these completely sugar-free? A: You can try substituting a sugar-free maple syrup alternative, but keep in mind that the texture might be slightly different as sugar helps with binding. You could also experiment with a small amount of mashed ripe banana for sweetness, but this will also alter the texture and flavor slightly.
Q: Are these naturally gluten-free? A: Oats are naturally gluten-free, but they are often processed in facilities that also handle wheat. If you need to ensure these bars are gluten-free, be sure to use certified gluten-free rolled oats.
Final Thoughts
These Healthy Peanut Butter Chocolate Overnight Oats Peanut Butter Fudge Bars are a testament to how delicious and satisfying healthy snacking can be. They’re quick to prepare, require no baking, and are packed with wholesome ingredients that will keep you feeling energized.