Introduction
I created these bars during last summer’s heatwave when turning on the oven felt like torture. The secret? Greek yogurt creates a tangy creaminess that balances the richness. I almost didn’t share this recipe—it’s my emergency “I need chocolate NOW” solution. Let me show you how these 10-minute miracle bars saved my sanity (and my sweet tooth).
Why You’ll Love This Recipe
- Ready in just 10 minutes active time (plus chilling) with zero baking required
- Only 7 simple ingredients you probably already have in your pantry
- The perfect balance of indulgent and nutritious (hello, protein from peanut butter and Greek yogurt!)
- Satisfies intense chocolate cravings without the sugar crash
- Customizable to fit various dietary needs and flavor preferences
- Makes an easy grab-and-go breakfast, snack, or healthier dessert option
Ingredients Needed
- 1/2 cup peanut butter
- 1/4 cup Greek yogurt
- 1/4 cup honey or maple syrup
- 1 teaspoon vanilla extract
- 1/4 cup cocoa powder
- 1 cup crispy rice cereal
- Pinch of salt
Ingredient Notes
For peanut butter, I recommend the natural, drippy kind with just peanuts and salt—the texture works better here than the shelf-stable varieties. The Greek yogurt should be full-fat for the creamiest results; I’ve tried with nonfat and the bars turned out noticeably drier. Dark cocoa powder gives these bars a rich, almost brownie-like flavor, but regular works perfectly fine. For sweetener, maple syrup creates a deeper caramel note, while honey provides a brighter sweetness.
How to Make It
Step 1: Prep Your Pan
Line an 8×8 inch pan with parchment paper, leaving some overhang on the sides for easy removal later. Pro Tip: Slightly dampen your counter before laying down the parchment—this keeps it from sliding around while you’re working.
Step 2: Mix The Base Ingredients
In a medium bowl, combine peanut butter, Greek yogurt, honey (or maple syrup), and vanilla extract. Stir until completely smooth and creamy.
Step 3: Add The Chocolate Factor
Add cocoa powder and salt to your mixture, stirring until fully incorporated with no dry streaks. The mixture will thicken noticeably.
Step 4: Introduce The Crunch
Gently fold in the crispy rice cereal until every piece is coated with the chocolate mixture. Work quickly but carefully—you want the cereal to stay crispy!
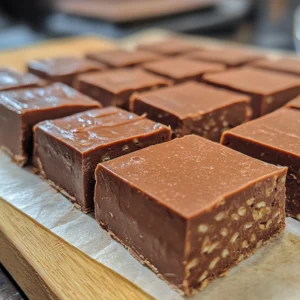
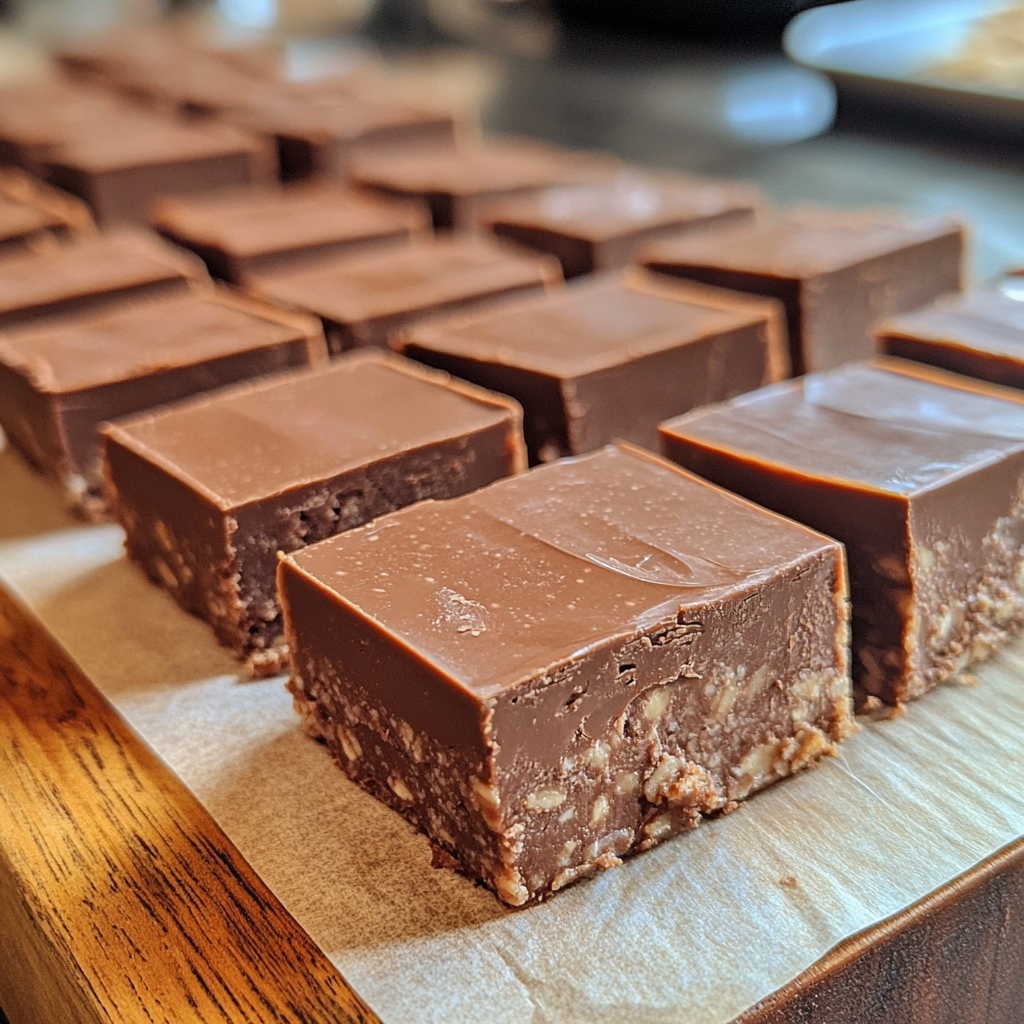
Step 5: Press And Chill
Transfer the mixture to your prepared pan and press firmly into an even layer. I use the bottom of a measuring cup wrapped in parchment to prevent sticking.
Nutritional Information
Each bar (when cut into 12 portions) contains approximately:
- 120 calories
- 4g protein
- 6g healthy fats
- 15g carbohydrates
- 9g natural sugars
- 1.5g fiber
They’re surprisingly filling despite their modest size, thanks to the protein-fat combo that keeps you satisfied.
Key Ingredients Breakdown + Health Benefits
Peanut Butter: Delicious and packed with heart-healthy fats, plant-based protein, and minerals like magnesium. I started using more of it during half-marathon training—and noticed better energy all day. My kids call it my “fancy peanut butter” because I save the good stuff for recipes like this.
Greek Yogurt: The secret star! It adds protein, a creamy texture, and a tangy kick that balances the sweetness. I first used it as a last-minute cream cheese substitute—and never looked back.
Cocoa Powder: Rich in antioxidants and mood-boosting compounds. It also brings minerals like iron and magnesium. I always use my “baking cocoa” here—my husband can tell when I swap it for the cheap stuff!
Crispy Rice Cereal: Not the most nutritious on its own, but it gives these bars that light, crunchy texture. I’ve tried other cereals… nothing compares to that classic crispy bite.
Why This Recipe Works
The magic of these bars lies in the unexpected marriage of temperatures and textures. The chilled, creamy base against the airy crunch of the cereal creates a multi-sensory experience that keeps you coming back for “just one more bite.”
From a food science perspective, it’s all about balance—the fat from the peanut butter creates richness, while the tangy yogurt cuts through that richness with acidity. The protein in both ingredients helps these bars set properly without requiring gelatin or other stabilizers.
The honey (or maple syrup) doesn’t just add sweetness; it creates crucial binding power while also keeping the bars slightly soft even when chilled. I learned this the hard way when I tried using a granulated sweetener once—the bars completely crumbled when I tried cutting them.
The touch of salt is non-negotiable, as it amplifies the chocolate flavor while creating contrast with the sweet elements. Trust me, I accidentally left it out once, and the bars tasted noticeably flat.
Is This Recipe Right for You?
These bars are perfect for busy parents, on-the-go professionals, or anyone trying to eat more mindfully without giving up life’s pleasures. If you’re looking for a healthier alternative to packaged granola bars or processed snacks, these fit the bill beautifully. They’re especially suited for hot summer days when you can’t bear to turn on the oven but still want something satisfying and homemade.
Athletes and active folks will appreciate the protein boost, while those with a sweet tooth will love how these satisfy cravings without the sugar crash that follows conventional treats. They’re also great for novice cooks—you literally cannot mess these up!
Who Should Avoid It?
These bars aren’t suitable for those with peanut allergies (though see the modifications section for alternatives). If you’re following a strict vegan diet, you’ll need to substitute the Greek yogurt. Those on very low-carb or keto plans may find the honey/maple syrup puts these outside their macros. And while these bars have less sugar than conventional treats, they still contain natural sweeteners, so individuals managing diabetes should adjust portions accordingly.
Customization Ideas
These versatile bars can be adapted in countless ways:
- Swap almond or cashew butter for the peanut butter for a different flavor profile
- Add 2 tablespoons of ground flaxseed or chia seeds for an omega-3 boost
- Mix in 2 tablespoons of protein powder (reduce cocoa slightly if doing this)
- Fold in 2 tablespoons of mini chocolate chips for double chocolate goodness
- Add 1/4 teaspoon of espresso powder to intensify the chocolate flavor
- Include 1/4 teaspoon of cinnamon for a Mexican chocolate twist
- Replace 1/4 cup of cereal with toasted coconut flakes for tropical flair
- Drizzle melted dark chocolate on top for an extra decadent finishing touch
Kitchen Tools You’ll Need
Nothing fancy required here:
- 8×8 inch square pan (or equivalent)
- Parchment paper
- Medium mixing bowl
- Measuring cups and spoons
- Sturdy spatula or wooden spoon
- Something flat-bottomed for pressing (I use a measuring cup)
I love that this recipe doesn’t require hauling out the stand mixer or food processor—just simple tools for a simple recipe!
Pro Tips & Common Mistakes
Using cold ingredients. Room temperature peanut butter and Greek yogurt blend much more smoothly. I keep my Greek yogurt refrigerated (obviously), but I measure it out first thing and let it sit while gathering other ingredients. For the peanut butter, 15-20 seconds in the microwave works wonders if you’re in a hurry.
Not pressing firmly enough. These bars need compression to hold together properly. After adding the mixture to your pan, press HARD with something flat-bottomed. My first few attempts crumbled because I was too gentle. Now I put some muscle into it—sometimes I even place a piece of parchment on top and use my body weight through my palm.
Cutting them too soon. Patience is key! These bars need adequate time to set up. I’ve ruined a batch by getting impatient and trying to cut them after just 30 minutes in the freezer. Give them the full 1-2 hours—trust me, it’s worth the wait.
For perfect squares, dip your knife in hot water and wipe clean between each cut. This gives you those crisp, clean edges that make your bars look professional.
Don’t overwork the mixture once you add the cereal. Excessive stirring will crush the cereal and you’ll lose that signature crunch that makes these bars special. I learned this after my 5-year-old “helper” enthusiastically over-mixed a batch!
Serving Suggestions
These bars shine as a quick breakfast paired with a piece of fruit—grab one as you rush out the door and eat it on your commute (that’s my Monday morning ritual!). For an afternoon pick-me-up, I sometimes sandwich a thin slice of banana between two smaller pieces to create a “nutrient-dense Oreo” of sorts.
For dessert, try crumbling a bar over a scoop of vanilla ice cream or Greek yogurt with berries. My kids love them straight from the freezer when they’re extra firm and almost fudge-like.
When I’m hosting brunch, I cut these into tiny bite-sized squares and serve them alongside fancier offerings—they’re always the first to disappear from the platter!
Reader Success Stories
Jamie from Seattle writes: “These bars saved my relationship with my 3PM sugar cravings! I make a batch every Sunday and portion them out for the week. My coworkers always ask what I’m eating because they smell so chocolatey. I’ve started adding a sprinkle of flaky sea salt on top, and it takes them to another level. My kids have no idea these are healthier than the packaged bars they used to beg for!”
Michael from Austin says: “As someone who works night shifts at the hospital, finding nutritious snacks that travel well and don’t need refrigeration for a few hours is challenging. These bars have become my go-to—they keep me satisfied without the crash I get from vending machine options. I add a scoop of chocolate protein powder to mine and they keep me going through those tough 3AM slumps.”
Deepa from Chicago shares: “I’ve tried dozens of ‘healthy’ dessert recipes that taste like obvious compromises, but these actually satisfy my chocolate cravings! I’ve experimented with different nut butters—the almond-tahini combination was unexpectedly amazing. Even my husband, who typically scoffs at my healthier swaps, keeps stealing these from the freezer!”
Storing & Freezing Guide
These bars are best kept chilled due to the yogurt component. They’ll maintain perfect texture in the refrigerator for up to 5 days in an airtight container. I separate layers with parchment paper to prevent sticking.
For longer storage, these freeze beautifully for up to 3 months. I wrap individual bars in parchment and store them in a freezer-safe container or zip-top bag. You can enjoy them straight from the freezer for a more firm, fudge-like texture (my preference!), or allow them to thaw in the refrigerator for about 20 minutes for a softer bite.
Pro tip for meal preppers: I often double the batch and freeze half for emergency snack situations. Nothing beats the feeling of remembering you have chocolate goodness ready and waiting in the freezer!
FAQs
Can I make these completely dairy-free? Absolutely! Substitute the Greek yogurt with dairy-free yogurt alternatives like coconut or almond milk yogurt. Just make sure you choose a thick, Greek-style version rather than regular plant-based yogurt, which tends to be thinner. I’ve made these with coconut yogurt when my lactose-intolerant sister visited, and they turned out wonderfully—with a subtle tropical undertone that paired beautifully with the chocolate.
My bars didn’t set properly and are too soft. What went wrong? This usually happens if there’s too much moisture in the mixture. Make sure you’re using thick Greek yogurt (strain it in cheesecloth if necessary), and if your peanut butter is particularly runny, you might need to add an extra tablespoon of cocoa powder or a few tablespoons of ground nuts to absorb the excess moisture. Also, be sure you’re chilling them long enough—they firm up significantly more at the 2-hour mark compared to just 1 hour.
Can I use something other than crispy rice cereal for the crunch? Definitely! While crispy rice cereal gives the classic light crunch, I’ve successfully used crushed graham crackers, granola (reduce sweetener slightly), crushed pretzels for a sweet-salty combo, and even crushed freeze-dried fruit for a fruity twist. The texture will be different but equally delicious in its own way.
Are these bars school-friendly for nut-free classrooms? Not as written, but you can substitute the peanut butter with sunflower seed butter to make them nut-free. The flavor will be slightly different but still delicious. Just be aware that sunflower seed butter can sometimes react with baking soda (not in this recipe) or certain ingredients to turn slightly green over time—perfectly safe, just amusing!
Final Thoughts
These No-Bake Peanut Butter Greek Yogurt Chocolate Crunch Bars have become my secret weapon for those moments when I need something satisfying but don’t want to derail my healthier eating habits. They remind me that nourishing your body and enjoying food don’t have to be opposing concepts.