
Introduction
My love affair with these no-bake squares started on the hottest day last summer. It was 98°F, the AC was broken, and I refused to turn on the oven. Desperate for a potluck dessert, I spotted a forgotten jar of peanut butter, a box of oats, and leftover crispy rice cereal. With nothing to lose, I mixed them all together and chilled the pan. At the party, they vanished in minutes! Even Mrs. Peterson from next door asked for the “recipe.” I just smiled—some of the best things happen by accident, right?
Why You’ll Love This Recipe
- Ready in just 15 minutes of active time – no oven required!
- Only 7 simple ingredients that you probably already have.
- Perfect balance of sweet, salty, and chocolatey flavors.
- Satisfies cravings while providing actual nutrition.
- Versatile enough for breakfast on-the-go, afternoon snack, or healthier dessert.
- Incredibly easy to customize with your favorite additions.
Ingredients Needed
- ½ cup natural peanut butter (creamy or crunchy)
- ¼ cup honey or maple syrup
- 1 teaspoon vanilla extract
- 1 cup rolled oats (old-fashioned, not quick-cooking)
- ¼ cup crispy rice cereal
- ¼ cup unsweetened cocoa powder
- Pinch of sea salt (about ⅛ teaspoon)
Step-by-Step Instructions
Step 1: Prepare Your Workspace (Setting Up for Success)
Line an 8×8 inch baking pan with parchment paper, leaving some overhang on the sides to create handles for easy removal later. Make sure all your ingredients are measured and ready to go, as this recipe comes together quickly once you start. Having everything prepped will ensure a smooth and stress-free process.
Step 2: Create Your Chocolate Peanut Butter Base (The Magic Mixture)
In a medium microwave-safe bowl, add the peanut butter and honey or maple syrup. Heat for about 30 seconds until just warm enough to easily stir together. Add the cocoa powder, vanilla extract, and salt, then whisk until the mixture is completely smooth with no cocoa powder streaks remaining. This creates the rich and flavorful foundation for our bars.
Step 3: Incorporate the Dry Ingredients (Texture Building)
Add the rolled oats and crispy rice cereal to your chocolate peanut butter mixture. Using a sturdy spatula or wooden spoon, fold everything together gently but thoroughly, making sure all the dry ingredients are evenly coated. Be careful not to crush the crispy rice cereal too much – you want to preserve that delightful crunch that makes these bars so satisfying.
Step 4: Press and Chill (Patience Pays Off)
Transfer the mixture into your lined pan. Using the back of a measuring cup or your fingers (slightly dampened to prevent sticking), press the mixture firmly and evenly into the pan, focusing especially on the corners. Cover with plastic wrap and refrigerate for at least 1 hour or freeze for 30 minutes until completely firm. This chilling time is crucial for the bars to set properly and be easy to slice.
Nutritional Information
- Calories: Approximately 165 per square
- Protein: 5g
- Carbohydrates: 20g
- Fiber: 3g
- Sugar: 8g (mostly from natural sources)
- Fat: 8g (primarily healthy unsaturated fats)
- Sodium: 65mg
- Serving size: 1 square (recipe makes approximately 9 squares)
Key Ingredients Breakdown + Health Benefits
Natural Peanut Butter – Listen, I used to buy the super processed stuff with hydrogenated oils and tons of sugar. Then my doctor gave me “the talk” about healthy fats. Switched to natural peanut butter and—what do you know—it actually tastes better! Contains those heart-healthy monounsaturated fats and gives you protein that keeps you full. I’ve tried both chunky and smooth in this recipe—both work great but I’m team chunky all the way.
Honey/Maple Syrup – So much better than white sugar! I started using these natural sweeteners after my sister would NOT stop talking about glycemic index at family dinners (thanks, Sarah). They’ve got actual nutrients and antioxidants, not just empty calories. Plus maple syrup reminds me of Sunday breakfasts growing up—pancake vibes without the pancakes!
Cocoa Powder – Dark, mysterious, and actually good for you? Count me in! I feel slightly virtuous using cocoa powder instead of chocolate chips—it’s got all these flavonoids that my nutritionist raves about. I’ve noticed I don’t get that mid-afternoon slump when I have these squares compared to when I grab a candy bar. Something about the theobromine giving a gentler mood boost than caffeine. Science!
Rolled Oats – My relationship with oats used to be… complicated. Childhood memories of gluey oatmeal, ugh. But these rolled oats in no-bake recipes? Game changer! They’re packed with this amazing fiber that keeps things moving, if you know what I mean. TMI? Maybe, but it’s true!
Crispy Rice Cereal – The unsung hero! Without this, we’d just have energy balls. The airy crunch makes these squares special—lightens up what could be a heavy snack. My kids’ cereal obsession finally pays off in my recipes.
Vanilla Extract – The little black dress of baking! Just a teaspoon transforms the flavor. I may have spilled a bit extra in one batch accidentally—that was the batch my neighbor requested the recipe for. Happy accidents!
Sea Salt – That tiny pinch might seem insignificant, but it really enhances all the other flavors, bringing out the sweetness of the honey and the richness of the peanut butter and chocolate. It’s all about balance!
Why This Recipe Works
The magic of these squares lies in the perfect synergy between the ingredients. I’m no food scientist—just someone who’s made this recipe approximately 37 times with various tweaks—but there’s something special happening here.
The peanut butter does double duty as both binding agent and flavor base. Plus it keeps you satisfied with those healthy fats. I tried using less once to cut calories and… total disaster. The bars just fell apart. Lesson learned!
The honey or maple syrup delivers just enough sweetness to balance the rich cocoa powder. I prefer honey in summer and maple syrup during fall—isn’t that weird? Something about seasonal cravings I guess.
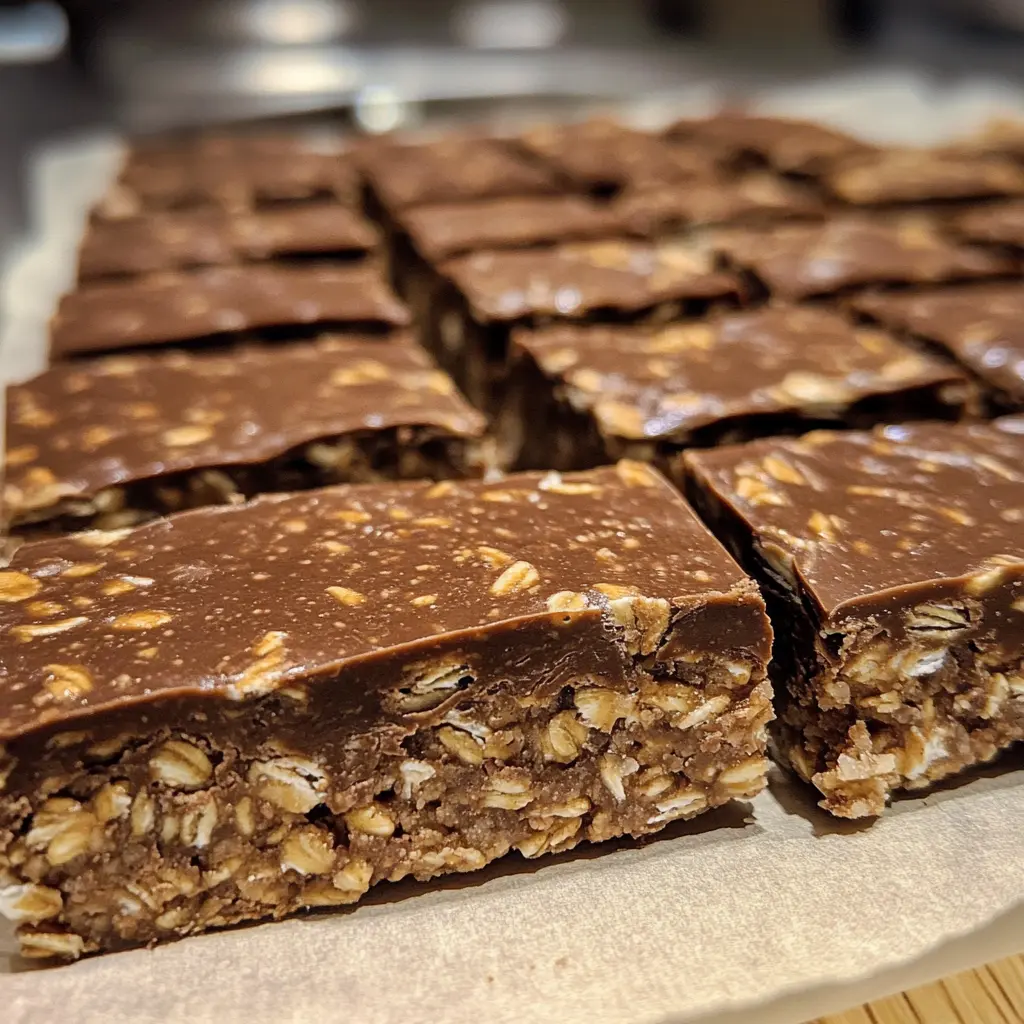
And that texture! The combination of rolled oats and crispy rice cereal creates this incredible contrast—chewy yet crisp, substantial yet light. My husband says they remind him of those fancy energy bars he buys for hiking trips, but “way better” (his exact words while reaching for a second square). The chilling process solidifies the peanut butter and honey, creating a firm but still slightly chewy bar that holds its shape perfectly when sliced.
Is This Recipe Right for You?
These no-bake squares are perfect for busy individuals looking for a healthier treat that doesn’t require baking. They’re ideal for parents wanting to involve kids in kitchen activities without the dangers of hot ovens. If you’re trying to incorporate more whole foods into your diet while still enjoying something that satisfies a sweet tooth, these squares hit the perfect balance. They’re also great for meal prepping healthy snacks for the week ahead.
Who Should Avoid It?
Those with peanut allergies should obviously steer clear, though I’ll share some substitution ideas below. If you’re following a very low-carb diet, you might find the oat content too high for your plan. Additionally, if you require precisely measured macros for specific training regimens, you may want to calculate the exact nutritional information based on your specific ingredients.
Customization Ideas
Nut Butter Variations: Substitute almond, cashew, or sunflower seed butter for those with peanut allergies. Add Texture: Fold in 2 tablespoons of chia seeds, hemp hearts, or chopped nuts for extra nutrition and crunch. Boost Protein: Mix in 2 tablespoons of chocolate or vanilla protein powder (reduce cocoa slightly if using chocolate protein). Fruity Twist: Add 2 tablespoons of dried cherries or cranberries for a tart counterpoint. Grown-up Version: Add a teaspoon of espresso powder to intensify the chocolate flavor. Extra Indulgence: Sprinkle the top with mini dark chocolate chips before chilling. Spice It Up: Add 1/4 teaspoon of cinnamon or a pinch of cayenne for unexpected warmth.
Kitchen Tools You’ll Need
8×8 inch square baking pan Parchment paper Medium microwave-safe mixing bowl Measuring cups and spoons Sturdy spatula or wooden spoon Sharp knife for cutting Plastic wrap or reusable cover I find that a silicone spatula works best for this recipe – it gets every last bit of the delicious mixture out of the bowl and makes spreading in the pan much easier than a wooden spoon.
Pro Tips & Common Mistakes
The biggest mistake I see people make with no-bake recipes
is not pressing the mixture firmly enough into the pan. You really need to compact it well, or your squares will crumble when you cut them. I learned this the hard way when I brought a batch to work and ended up with more of a… well, let’s call it a “deconstructed energy bar situation” than neat squares! My coworkers still ate every crumb though.
Temperature control is crucial too. One time I was in such a rush—trying to make these while on a conference call—that I added the cereal when the mixture was way too hot. Soggy city! If your peanut butter mixture is too hot when you add the cereal, goodbye crunch. Now I always let the mixture cool just slightly after heating.
And patience. Oh my goodness, patience! Last Thanksgiving, I was trying to speed things up before guests arrived and… disaster. The squares weren’t fully set, and when I tried to cut them—pure mush! My brother-in-law still jokes about my “chocolate peanut butter soup.” Those extra 15-20 minutes of chilling time make all the difference between Instagram-worthy squares and a spoonable dessert. Not that there’s anything wrong with that—I served it over ice cream and pretended that was the plan all along!
Serving Suggestions
I love these squares with a cold glass of almond milk or a hot cup of coffee for an afternoon pick-me-up. For breakfast on-the-go, I’ll wrap one in parchment paper and take it with a piece of fruit for balance.
If serving as dessert, try adding a drizzle of melted dark chocolate over the top and a tiny sprinkle of flaky sea salt just before serving. When I’m feeling particularly fancy, I place a square in a bowl with a few fresh berries scattered around – the tartness pairs beautifully with the rich chocolate and peanut butter flavors.
Reader Success Stories
“Made these when it was too hot to turn on the oven and my kids went CRAZY for them! They asked if we could pack them for school lunches, and I felt great knowing they were getting something nutritious instead of processed snacks. They couldn’t believe something this ‘dessert-like’ was actually healthy!” – Jennifer K.
“As someone who works from home, I’m always looking for snacks that satisfy my sweet tooth but don’t send me into a sugar crash during important Zoom calls. These squares have become my go-to afternoon treat – they’re just sweet enough, and the protein from the peanut butter keeps me full until dinner. I add a tablespoon of ground flaxseed to mine for extra nutrition.” – Marcus T.
Storing & Freezing Guide
These squares will keep well in an airtight container in the refrigerator for up to 1 week. I recommend placing a piece of parchment paper between layers if you stack them to prevent sticking.
For longer storage, these freeze beautifully for up to 3 months. Wrap individual squares in parchment paper, then place in a freezer-safe container or zip-top bag. This makes it easy to grab just one when you need it.
To thaw, simply transfer a square from the freezer to the refrigerator for about 30 minutes, or enjoy slightly chilled for a more fudge-like texture. I actually prefer them slightly frozen in the summer months – they’re almost like an ice cream bar!
FAQs
- Can I use quick-cooking oats instead of rolled oats?
- Yes, but the texture will be denser and less interesting. If quick oats are all you have, try using 3/4 cup instead of the full cup to prevent the squares from becoming too compact.
- My mixture seems too dry and crumbly. What should I do?
- Different brands of peanut butter have varying levels of oil and thickness. If your mixture is too dry, add an additional tablespoon of honey or maple syrup, or even a tablespoon of melted coconut oil to help bind everything together.
- Can I make these completely sugar-free?
- Yes! You can substitute a sugar-free maple syrup alternative or use mashed ripe banana (about 1/4 cup) as a natural sweetener instead of honey or maple syrup. The texture will be slightly different, but still delicious.
- How can I make these school-friendly for nut-free classrooms?
- Sunflower seed butter makes an excellent substitute for peanut butter in this recipe. The flavor is slightly different but still delicious, and it maintains the right texture for binding the squares together.
Final Thoughts
These no-bake chocolate peanut butter oat crunch squares have become my secret weapon for busy weeks when I want something nutritious yet satisfying without spending hours in the kitchen. There’s something deeply comforting about the classic combination of chocolate and peanut butter, especially when transformed into something you can feel good about enjoying regularly.